Attractive Water (Surface Tension) Part 2

As discussed previously, water molecules are polar in nature and forms a strong network attracting each other which can be seen in the diagram below:

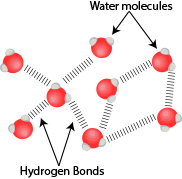
Polar water molecules attracted to each other via hydrogen bonding

Before jumping into explaing the moving pepper, we need to know a bit more about another important player in this experiment – detergent. A molecule of detergent consists of two parts – the water-loving (hydrophilic) head and the water-hating (hydrophobic) tail. This means that the head would be attracted to water molecules while the tail would try to avoid them as much as possible.

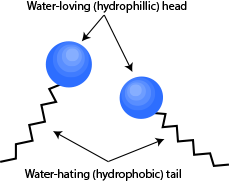
Illustration of detergent molecules

Now, try imaging what will happen when you introduce detergent molecules to this network of water molecules.

The hydrophilic head of the detergent molecules will be attracted to the water molecule and at the same time, the hydrophobic tail will be as far away as possible from the water molecules.

The detergent molecules would form an all-round barrier, with the hydrophilic head facing outwards towards the water molecules but the hydrophobic tail will be facing inwards.

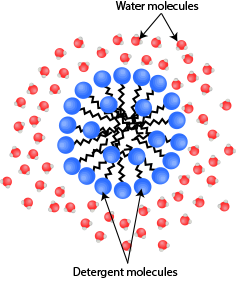
Detergent molecules forming a “ball-like shape” so that the hydrophilic head would maximise contact with water while the hydrophobic tails will minimise contact with water.

The strong network of water molecules is now broken at the point where the detergent molecules is introduced (image the network of water molecules are like the rubber surface of a blown balloon and introducing detergent is like poking the surface with a sharp needle!)

At the point where the detergent is introduced, the hydrogen bonds between the water molecules will weaken. However, the other sides that are “detergent-free” still maintain the  strong hydrogen bonding and thus pull the water molecules outwards to the edge of the plate.

This motion will move the pepper particles floating on the surface along and there, you have the “balloon skin ripping motion”!

Jelly Lens

I found this article that I have written about 7 years back! Well it is still a nice home experiment to try out!

———-

I remember reading this interesting article by CSIRO on making Jelly lens.

I tried making the lens myself and I guess it works great for a demo! Before we start, some words of caution!

Warning!!!

  1. Do not eat the jelly given to you as they are not meant for consumption!
  2. Do not point the laser pointer into the eye of anyone and do not play with it unless told to do so.
  3. Only use the knife under the supervision of an adult.
  4. If you are preparing the jelly mixture at home, do it only with the supervision of an adult as there are heating involved.

What you need:

  • Cooking Pot
  • Heating Element (Stove)
  • Measuring Beaker
  • Knife
  • Container
  • Measuring Spoon
  • Weighing Machine
  • 1000ml of water
  • 220g of sugar
  • 20ml of Konnyaku Jelly Powder
picture_10

Method:

  1. Prepare 1000ml of water, pour into the cooking pot and bring it to boil. Once the water is boiling, turn off the heat source.
  2. Add in 15ml of Jelly powder and 220g of sugar into the prepared water and stir thoroughly.
  3.  Once the powder are all dissolved in the water, turn on the heat source and allow the solution to boil slowly.
  4. Allow the mixture to boil for about 5 to 10 minutes before turning off the heating element. You will notice little bubbles forming in the mixture. Stir well.
  5. Let the mixture cool down for a while (and continue stirring in the pot) before pouring into the container for the jelly to set.

Fun Activities:

Well, you can cut the jelly lens into different shapes like prism, concave, convex lens and many more! Discover how light actually bends in these mediums! Learn why lens are shaped the way they are and the use of them! Importantly, have fun learning!

picture_1
10g1

I’ve also found 2 nice videos on Jelly Optics on YouTube:

Maybe I’ll start doing my own videos too on this!